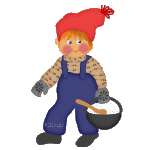
Santa looking for some hungry people.
He has good rice porridges in the pot.
I have first made it in psp 7 but now I straight it for Psp 9.
It's make by selection, which inn
this Zip-file. Open the zip-file in Psp's selection folder
.
Also a
zip with 1. Preset Shapes and
a Styled Line, if you dont have them.
Open shape i Psp's Preset shape folder and Line in Styled lines.
For the hair I use Eye Candy 2000.
1.
We start with an Image on 800 x 900
It's big but we resize it .
New layer call it head. Foreground
color #ebb473.
Go to Selection / Load from disk and find
the folder where you open the zip-file.
Open head file.
and fill.
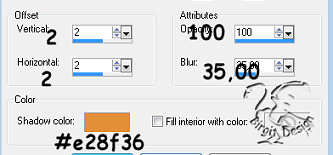
Go to selection / Float and then to Effects /
3D effects / Cut Out with these settings.:
Deselect.
2.
New layer, ear. Move this layer
behind head layer.
Open ear file.
Color, Float and Cut Out as head but set blur to 13,6.
Deselect.
3.
New layer, eye1. Foreground white.
Open eye1 file and fill. Deselect.
4.
New layer eye2. Foreground #474cd0.
Open eye2 file and fill.
Go to Effects / 3D effects /
Innerbevel whit this settings :
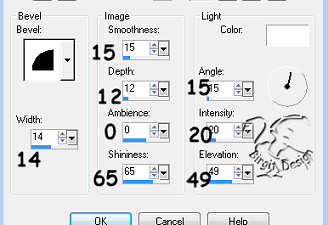
Deselect.
Merge Down
and call eye.
Right click layer and choose duplicat use
mover  and
place it.
and
place it.
5.
New layer, nose and eyebow.
Foreground #a35807, background closed.
Use Pen Tool, freehand
size 2. Make some lines.
New layer mouth. Foreground
#c00100.
Pen Tool 2. Paint mouth.
6.
New layer cheeks. Foreground #de7171.
Use Paint Brush Round. Make 2 cheeks.

Deselect.
7.
New layer hair. Foreground #c4660a, background #5f3207.
Open hair file.
Go to Plug-in. Eye
Candy / Fur with these settings:
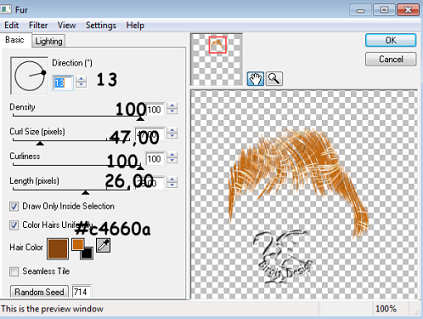
Deselect.
8.
New layer, caps. Foreground #ec4242.
Open caps file and fill.
Float and cut Out as head
but set blur to 45,7 and color C21C1C.
Deselect.
9.
New layer tassel. Forground #c00000.
Pen Tool, freehand size 6.
Do some loops in the end of the
caps. Set Pen Tool to size 2 and make some lines on the caps.
Here we have the head:
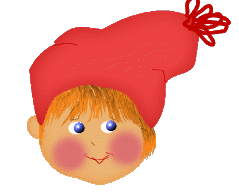
You can now merge visible
10.
New layer sweater. Foreground #cfac87.
Open sweater file and fill.
Float and Cut Out as head but
set blur to 45,7 and color #af7c47.
Deselect.
11.
New layer, design. Foreground #795735,
background closed.
Use Pen Tool, linestile Whip size 1,5 and make some
lines at the sweater.
Look at picture.
If your lines are outside., Then activ
Sweater Layer,
Go to Selection/All - Float- Invert. Then Activ Lines Layer, Edit/Cut.
12.
New layer, pants. Foreground #40437c.
Open pants file and fill.
Float and Cut Out as befor but
color #000040.
Deselect
13.
New layer, left brace.
Open l.brace
file.
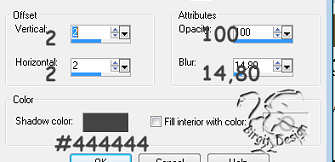
Color, Float and Cut Out as pants but set blur to
14,8. Deselect.
14.
New layer, right brace.
Open h.brace
file and do as v.brace.
Deselect.
15.
New layer, left shoe. Move layer
behind pant layer.
Foreground #404040. Open v.shoe file
and fill.
Deselect.
16.
New layer, right shoe.
Open r.shoe
file and do as v.sho.
Deselect.
17.
Stand on right brace layer. New
layer neck band.
Foreground #cfac87. Open neck band file
and fill.
Float and Cut Out as sweater but set blur to 14,8.
Deselect.
18.
New layer, design. do as for sweater.
19.
New layer, left mitten.
Foreground #808080. Open mitten file and fill.
Float and CutOut as
before but color #444444.
Deselect.
20.
New layer, design.
Foreground
closed, background #444444.
Use Preset shapes, flower 7.
Make a flower.
Take paint brush size 6 and make some
dotts:

21.
New layer, pot. Foreground #444444.
Open pot file and fill.
Float and Cut Out as befor but
set blur to 45,7 and color black,
Deselect.
22.
New layer, porridge. Forground white.
Open porridge file and fill.
Deselect.
23.
New layer, rice. Forground #C0C0C0.
Open rice file and fill.
May be you have to zoom a little.
Deselect.
24.
New layer, handle. Foreground #444444.
Open handle file and fill.
Deselect.
25.
New layer, ladle. Forground #ca8d52.
Open ladle file and fill.
Deselect.
On the same layer,
make some lines with Pen Tool size 1
Foreground color #a66e38. Background closed:

26.
New layer,right mitten.
Forground #808080. Open r.mitten file .
Float and Cut Out:.
Deselect.
27.
New layer, design as left mitten.
Maybe you have to erase some of handle ?
Zoom a little  and use eraser
  to remove a bit of mitten in front of the
handle
to remove a bit of mitten in front of the
handle

Now Santa are ready to go out with
his pot. You can now resize it 50 %. Merge visible all
layers and save it as a tube.
I hope you enjoyed this as much than I do.